7 Feb, 2011
 Windows Media Centre is a fairly complete package out of the box, but what separates it from many other non computer media centres is that it offers the freedom to customise it to suit your wants and needs. While the TV guide looks nicer than many others, the ability to replace channel names with channel logos will really make your media centre stand out.
My Channel Logos is a program that lets you replace channel names in your Windows Media Centre TV guide, with logos of the channels. Not only is it easier to recognise a channel logo from a distance, it makes the guide more appealing and easier to use.
 My Channel Logos has become a must have program for anyone who uses Windows Media Centre. The helpful community are making new logos as new channels become available, so there is very little work for you to do. It is as simple as installing and running it.
My Channel Logos will detect which channels you have in your Windows Media Centre and populate the logos where available. If there are channels that don’t have an available logo, you can easily add your own by clicking on the empty box and selecting a picture from your picture library.
My Channel Logos can also be used by Remote Potato to show the logos in its own TV guide. If you use Windows Media Centre, it is well worth your while to invest the 5 minutes required to install this tool.
I have found My Channel Logos to be flawlessly reliable and easy to use. There is no need to run this program each time Windows starts. Once My Channel Logos has entered the data, Windows Media Centre retains it and the only reason to open the software up again is to make alterations.
My Channel Logos runs on Windows 7 Media Centre and is available for free (donations welcomed) from My Channel Logos.
8 Jan, 2009
Difficulty Rating:
 I wanted to find a way to power on my computer at 7:30am each morning. This was so that my email and various websites I visit can be updated before I sit down at my computer. With mornings being such a rush, I wanted to use some automation to help me out.
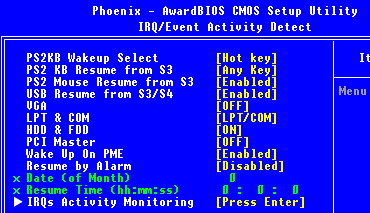
There are normally a number of features in the power management component of the BIOS options, which permit all types of triggers to wake a computer up from hibernation or standby modes. However, if the computer is turned off, these will not work.
One of the triggers allows us to set the computer to launch via the real time clock. We can set how frequently the machine will wake up, or what time of the day we want it too wake up.
Every BIOS is a little different so it is impossible to give specific instructions, but it is not too hard to find. Go into the BIOS and find Power Management. In here, ensure S3 is enabled. There should be an option called “Resume by alarm”, or “Wake-up on RTC”. Once this is enabled, you will be able to set the time you want your computer to turn on. That should be all there is to it.
While I had not seen this feature before, I checked the 3 computers I have access to, to see if they also had this option. These machines are of various ages and they all included this feature. Only one time can be set in the BIOS, so using this method will not work if you want it to turn on in the morning and the afternoon. If you want to do this, you will need to use the task scheduler.
15 Oct, 2008

Universal remotes are great devices which simplify the control of home entertainment devices. They cut down the pile of remotes to one single remote, removing the need to use multiple remotes to do a simple task like watching TV. This also clears up space on the coffee table so that it can be used for better stuff like.. umm coffee.
While making life easier for the person who set up the remote, other family members or friends may become confused by it. All it takes when pressing the remote buttons is for a cat to walk by, or a coffee table in the way of the infra red signal to go walkabouts. There could also be configuration problems where the universal remote isn’t completely compatible with a device. This may result in some buttons needing to be inputed manually.
While the remote works correctly most of the time, when something does go wrong, my wife has no idea what buttons to press to get things up and running. Why should she need to know the inner workings of something that I set up? I continually tried to make minor adjustments to the remote configuration, and even rewired the equipment at one stage, to make life a little easier for her. In the end, there was only one solution.
I put together a cheat sheet for my wife so that she can do her own fault finding. The cheat sheet lists what devices need to be on for a certain activity, and what setting each device needs to be on. Using this list, she can look on the front panel of each device and figure out where the problem is. There are also additional notes describing what may go wrong, and how to rectify it.
I tested it out on my wife and the results were much better than anything else I had come up with. Feel free to download it here and alter it, or create your own. It isn’t a complicated document, but I hope it will save my wife from any continued frustration.
5 Jul, 2008
 I have received many requests from readers asking how to quickly change the default audio device in Windows. This can be useful as many computers now have various audio devices which can be used. For example, you may want to use one playback device which is connected to PC speakers for playing games and Windows sounds, and another playback device which is connected to a sound system for music or movies.
Windows lets you change the device that audio is sent out of, in the Sounds and Audio options within the control panel. While this method works, it can be tedious to navigate to, especially if you want to change your playback device regularly. Many individual programs also let you choose which audio device will be used for playback, but then changing the playback device within the program requires a separate set of preferences to navigate through.
I came across a couple of tools that make switching the default playback device much easier, and that offer much more control over your audio devices. These tools are System Tray Audio Device Switcher (STADS), and Quick Sound Switch (QSS). Both are great utilities, but they do things slightly differently, and both offer slightly different features.
In this article, I will run through what they both do so that you can decide which one is best for your needs.
Read the rest of this entry »
13 Feb, 2008
 Windows and Vista Media Centers are a great option for anyone wanting to turn their computer into a home theatre PC. Their interfaces look nice and they are easy to use. Get the most out of it by viewing all your music and pictures, or even schedule recordings, while you are away from home.
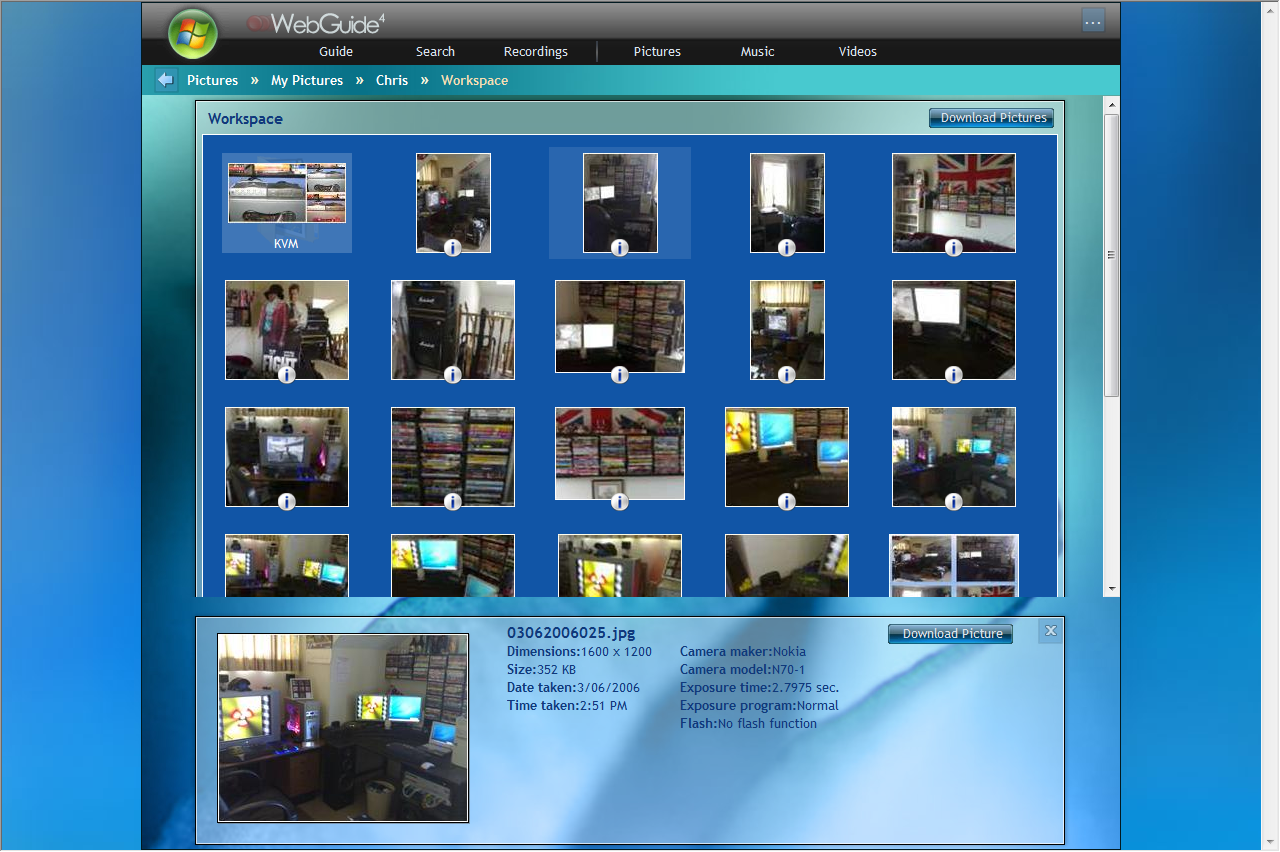
Having researched a number of programs designed for this task (and having very limited success with them) I had been using Remote Desktop to schedule recordings when I was away from home. That was until I read a detailed article from Lifehacker showing us the inner workings of Webguide. This article has plenty of helpful tips and screenshots to guide you through it.
Webguide is accessed through a web browser and delivers a powerful set of features. You are able to view pictures, stream music and movies. You can even remote control your Media Centre all through the web interface. My favourite feature would have to be the ability to schedule recordings while on the road.
Webguide was much easier to install than any of the other web control systems I have tried. There is no need to install Apache as Webguide comes with its own web server. It all works straight out of the box if you are using it on a local network.
Making it accessible from computers that are not on your local network is a bit more challenging. You will need to setup port forwarding and install IIS, but there are enough instructions available to get you going.
I recommend giving this one a go. I am already enjoying the freedom Webguide offers. I encourage you to read Lifehacker’s article in parallel with the FAQ of the Webguide website to make the install easier on you. And yes, of course Webguide is free.
 Windows Media Centre is a fairly complete package out of the box, but what separates it from many other non computer media centres is that it offers the freedom to customise it to suit your wants and needs. While the TV guide looks nicer than many others, the ability to replace channel names with channel logos will really make your media centre stand out.
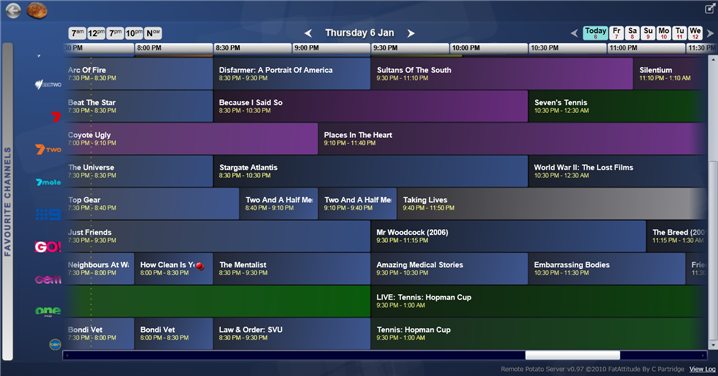 My Channel Logos has become a must have program for anyone who uses Windows Media Centre. The helpful community are making new logos as new channels become available, so there is very little work for you to do. It is as simple as installing and running it.